How to Blur Sensitive Text in Screenshots with AI + ImageMagick

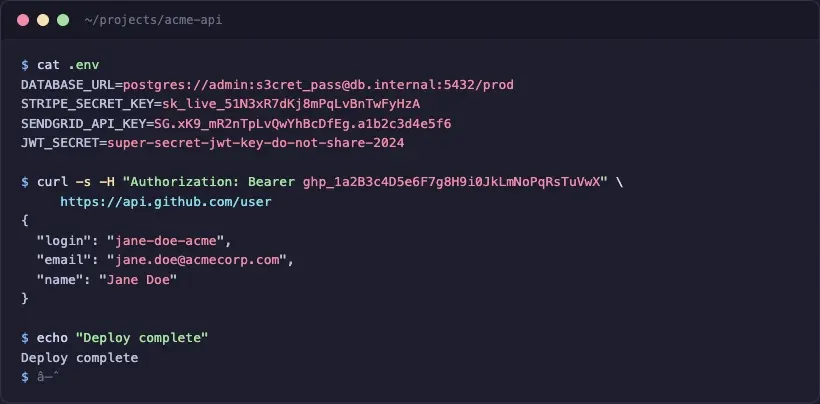
Last month I dropped a screenshot into a GitHub issue. Standard stuff, terminal output from a failing deploy. That screenshot sat there for six hours before someone noticed the Stripe live key in the corner. And the customer email three lines above it. And the database connection string at the top of the .env dump.
Six hours on a public repo. Ok, I made up that example to illustrate what we've all done at some point - forgetting to blur out sensitive info.
When this happens, you need to revoke the key, rotate credentials, and you're basically in fire drill for the rest of the day. And it is easy for this to happen. Developers paste screenshots constantly: PRs, Slack threads, documentation, blog posts, support tickets. Most of the time the sensitive data isn't the point of the screenshot. It's background noise you don't notice until someone points it out.
Documentation screenshots is common for me. I grab a screenshot of my API dashboard to show a feature, and the dev tools panel is open in the background with an Authorization header visible.
My standard blurring workflow is to open up Xnapper and then manually blur out and image...or if I'm lazy ask a co-worker who is skilled with Photoshop to do it for me.
However, now with AI agents, it has become easy. An AI agent reads the screenshot (or takes one for you), finds the sensitive text, and uses the command line tool ImageMagick to blur and redact the sensitive text. I even created a blur skill to help. That's what we'll be walking through shortly.
The short version: Install the blur-image skill, tell your AI assistant "blur the sensitive data in screenshot.png," and it handles everything — detects credentials, emails, and tokens, asks what you want blurred, and runs ImageMagick. You never touch a pixel coordinate.
The Way
The latest AI models are surprisingly good at finding text in screenshots, like Opus 4.6 or Codex 5.3. They can read terminal output, identify email-shaped strings, recognize API key patterns, and distinguish between sensitive content (a sk_live_ key) and harmless content (a syntax-highlighted keyword). They do what your eyes skip: scan every pixel of an image for anything that looks like it shouldn't be shared. Feed a screenshot to Claude Code or Codex and ask "what sensitive text is in this image?" and you'll get back a list with coordinates. Accurate enough to be useful, imprecise enough that you need padding.
ImageMagick is my favorite and handles the actual redaction. It's a command-line image processing tool that's been around since 1990. You point it at a rectangular region in an image and tell it to blur, and the pixels in that region become unreadable. Combine the AI's ability to find sensitive regions with ImageMagick's ability to blur them, and you get a workflow that catches things you'd miss and executes in a few minutes. No GUI, no dragging rectangles, no "did I cover that whole token or just most of it." Don't you just love AI!
Prerequisites
- ImageMagick 7+:
brew install imagemagickon macOS,apt install imagemagickon Ubuntu - An AI coding assistant: Claude Code, Codex, Cursor, Windsurf, or any tool that can read images
- The blur-image skill (recommended):
npx skills add jamdesk/skills --skill blur-imageThis Vercel skills package is a great way to install and manage skills. Once installed just run with /blur-image. - A screenshot you want to redact
The Core Command
ImageMagick's -region flag is the key to targeted blurring. It selects a rectangular area of the image, applies the next operation only to that area, then resets. Stack multiple -region flags to blur several areas in one pass:
magick input.png -region 200x50+350+120 -blur 0x20 output.webpThe syntax breaks down like this: -region WxH+X+Y selects a rectangle W pixels wide and H pixels tall, starting at X pixels from the left edge and Y pixels from the top. ImageMagick uses a top-left origin, so +0+0 is the upper-left corner. -blur 0x20 applies a Gaussian blur with sigma 20 to the selected region. After the blur, the region resets and the next operation applies to the full image (or you can chain another -region for a different area).
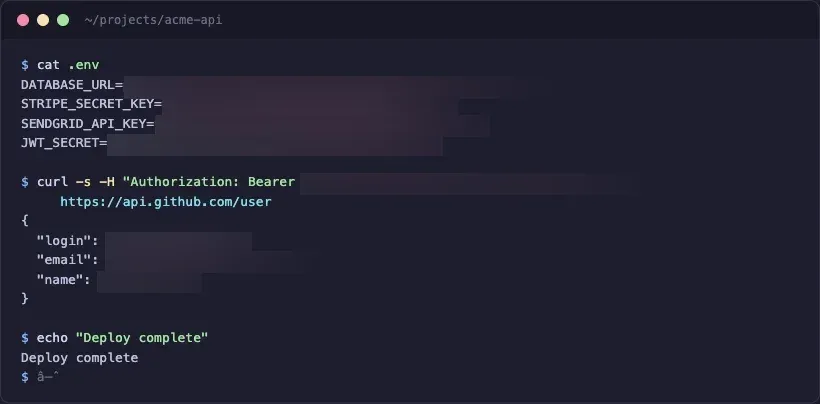
The environment variable names stay readable so you can tell what was redacted, but the actual secret values are gone. We used separate -region flags for each value, one per .env line, one for the Bearer token, and one per JSON field. The blur starts right after the = or : delimiter, so JWT_SECRET= is fully visible while the value after it is smeared. For JSON values, the blur covers the surrounding quotes too, so you don't get stray " characters sitting at the edges of a blur region looking weird.
Blur Strength Matters
Sigma in -blur 0xSIGMA controls how aggressively the pixels are scrambled. This isn't cosmetic. It's a security parameter. Research has shown that Gaussian blur with a low sigma can be partially reversed using deblurring algorithms, especially on high-contrast text against a solid background (exactly what terminal screenshots look like).
Use sigma 15 or higher for anything with real credentials. We default to 20. For maximum security, skip blur entirely and use solid fill:
magick input.png -region 200x50+350+120 -fill black -colorize 100 output.webpSolid fill is irreversible. Original pixels are replaced, not smeared. Tradeoff is aesthetics: black rectangles look more aggressive than a soft blur.
Multiple Regions
Real screenshots usually have several sensitive areas. Chain them:
magick screenshot.png \
  -region 560x30+170+62 -blur 0x20 \
  -region 470x35+250+173 -blur 0x20 \
  -region 250x80+65+235 -blur 0x20 \
  -quality 85 screenshot-blurred.webp
All regions are processed in a single pass. ImageMagick reads the image once, applies each region+blur pair, and writes the output.
Detecting Sensitive Text with Claude Code
With the blur-image skill installed, you don't think about coordinates at all. Give Claude Code, the tool of your choice, a screenshot and describe what you want in plain English:
$ claude

> blur the sensitive data in screenshot.png using /blur-image skill

I'm using the blur-image skill to identify and blur sensitive regions.

Preflight: magick found at /opt/homebrew/bin/magick (v7.1.2)
Image: screenshot.png (820x404 PNG)

I found sensitive content in 3 areas:

- .env values: 4 secret values after the = signs
  (DATABASE_URL, STRIPE_SECRET_KEY, SENDGRID_API_KEY, JWT_SECRET)
- Authorization header: Bearer token in the curl command
- API response: personal data (login, email, name fields)

Blur all of these? Or tell me which to skip.
You confirm, it runs ImageMagick, and reads the output image back to verify the blur landed correctly. No pixel coordinates, no manual region selection. The tricky part is getting the blur region positioned correctly. Start the blur too far left and you clip the label (JWT_SECR instead of JWT_SECRET=). Too narrow and characters peek through at the edges. The skill anchors each blur region at the delimiter character and verifies the output, catching positioning errors that a human would need to zoom in to notice.
The skill asks targeted questions when the content has structure: "Blur just the values after the = signs, or the whole lines?" or "The JSON response has login, email, and name — blur all three?" You describe what to blur in human terms, the skill handles the geometry.
This handles the part that's hard for humans (scanning every line of a screenshot for patterns that look like secrets) and ImageMagick handles the part that's hard for AI: pixel-level manipulation of image data.
However, AI ain't perfect, so you definitely need to review the output as guide the AI to fix any problems you find. If you're familiar with the latest AI models, then you know exactly what I mean.
Tips and Gotchas
- Coordinates use a top-left origin in ImageMagick:
+0+0is the upper-left corner of the image, X increases rightward, Y increases downward. If your AI returns center-origin coordinates (some vision models do), the blur will land in the wrong place. Always specify "top-left origin" in your prompt, if you need to rework the blurred image, when asking for coordinates. - Always save output as WebP (
-quality 85) rather than PNG. WebP produces smaller files at equivalent quality, which matters for blog images and documentation. The-quality 85flag keeps the file size reasonable without visible compression artifacts. - One last detail about region positioning: anchor your blur at the delimiter character (
=or:) and pad to the right, not to the left. Padding left clips variable names. Padding right just adds a safety margin past the end of the value, which is harmless. AI coordinate detection has error margins of 20-50px depending on the model, so erring slightly right is always safer than slightly left.
A final caveat: Watch your model token usage. Reading and understanding images can be expensive. For example, I ran the above example in Claude code with Opus 4.6 high thinking and around 60K tokens were used.
The Blur-Image Skill
The skill referenced throughout this article handles the full pipeline: checks for ImageMagick, reads the image, detects sensitive regions, asks what you want blurred in plain language, runs the command, and verifies the output. Two modes: auto-detect (AI scans for secrets) and user-guided ("blur the email in the top right").
npx skills add jamdesk/skills --skill blur-imageThe source is on GitHub at jamdesk/skills.
Screenshots Are a Habit Worth Fixing
I blur screenshots before every PR now. Every docs update, every blog post, every Slack message with terminal output. Running the skill has become muscle memory the same way running tests before pushing became muscle memory.
My favorite thing to do with AI is to automate the boring parts. Your eyes are better spent on code or UI review than pixel-scanning screenshots for stray credentials.